The problem with analog calendars, if you’re old enough to even remember those, is that they required you to look at them to work. Digital calendars may be better at reminding you to do things, but they still can’t read your mind. Google Calendar, for instance, can only do what you tell it to do. The Google system may be good at integrating dates and activities from your other Google applications, but the calendar becomes much more intuitive after you give it some careful directions.
While you may think you have the Google Calendar basics down, there are a number of features that can help you schedule events and keep your calendars up-to-date in a more efficient manner. If you mostly access your Google Calendar via your phone, there’s also a good chance you’re missing out on a lot of Google Calendar features that can be accessed or activated in the desktop settings.
Here’s a list of six useful Google Calendar tips and tricks you need in your life:
1. “Negotiate” a meeting time
When it comes to planning meetings there are two helpful scheduling options you may not be utilizing.
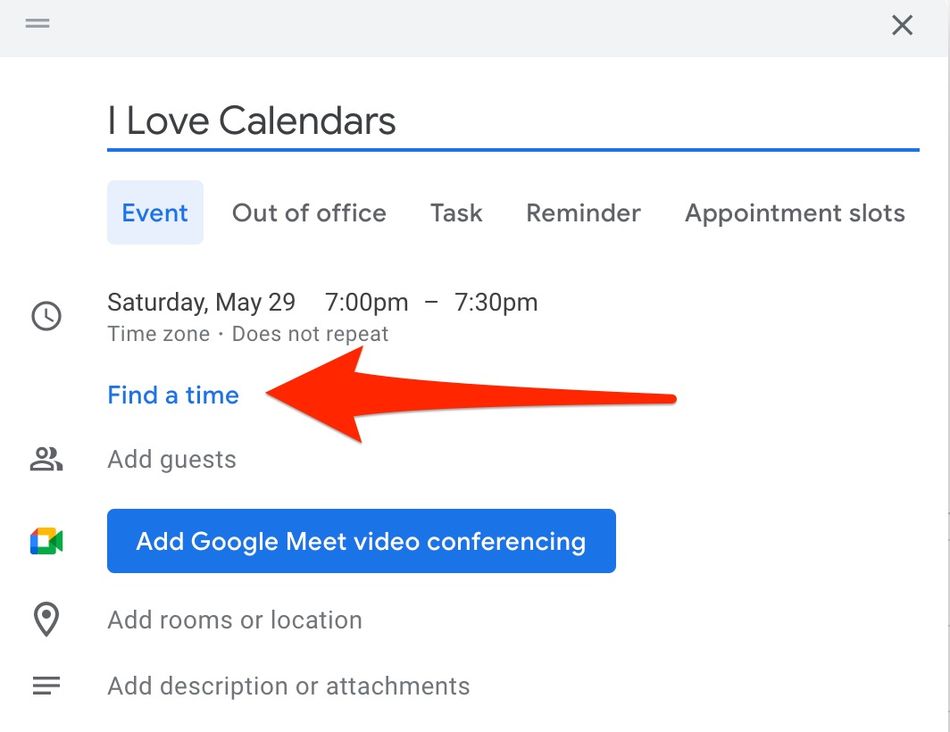
First, you can choose “Find a time” when creating an event. After selecting this option, the system will show you the schedules of each participant on a given day, as long as they also use Google Calendar.

Does this time work for everyone?
Image: screenshot: Google Calendar
Using this feature will help you schedule a meeting when you know everyone is free, so you can hopefully avoid a series of conflicts and excuses. Another option is to choose “Suggest a time” for each participant. This feature prompts the system to automatically generate a list of meeting time options, so you can select the one you feel works best.
2. Add a video conference link
When you’re creating an event or calendar invite Google lets you add a link to a video conference via Google Meet that can hold up to 100 participants.
The video link is incredibly simple to set up, as they literally prompt you for it when you create an event on the calendar. Just click the “Add Google Meet video conferencing” button when creating your event and a link will be generated and included on the invite.

Can I see your face?
Image: screenshot: Google calendar
3. Enable keyboard shortcuts
Did you know Google Calendar has a whole set of keyboard shortcuts available? All you have to do to access the shortcuts is enable them in Settings. Click the gear in the upper right corner of your calendar, hit Settings, then select “Keyboard shortcuts.”
Here’s a sample of some of the most helpful keyboard shortcuts:
-
Search: shift + /
-
Create event: c
-
Scroll to previous date range: k or p
-
Scroll to next date range: j or n
-
Jump to today: t
-
Delete event: Backspace or Delete
Switch views to:
-
Day: 1 or d
-
Week: 2 or w
-
Month: 3 or m
-
7 days: 4 or x
-
Agenda: 5 or a
If you want your calendar to give you more information on your scheduled events, you can change the format density, but finding this setting is a bit of a challenge. Instead of going into Settings, click the gear icon on the upper right corner of the webpage and look for “Density and color.” Then, change the “Information density” setting to “Compact.”

Look at all that info!
Image: screenshot / google

Do you want that info? Here’s how to get it.
Image: screenshot / google
4. Send emails to a group
If you need to send an update to a group of people that are included in an event, you don’t have to go through the struggle of remembering all of their names and email addresses. You can draft an email to all the people through the event itself. Click on your calendar event, then click the envelope icon to email guests and compose your note. All done.

For our next trick we will click that little envelope.
Image: screenshot / google
5. Transfer event ownership
After you’ve created a meeting or event, you can back out of it and put someone else in charge! Follow the edit function on the event, choose “More actions” and at the bottom of the list you’ll see “Change owner.” Select it and type in the name or email address of your designee. Then breathe a sigh of relief.

Here, take this.
Image: screenshot: Google Calendar
6. Make a daily agenda
Some days I make a to-do list and email it to myself. And other days I manually send reminders to myself all day long. Google Calendar will actually do this for you. Go to Settings and choose the calendar that you want the agenda to generate from under “Settings for my calendars.” Under the “Other notifications” section change the “Daily agenda” option from “None” to “Email.”

Let Google Calendar make your to-do list for you.
Image: screenshot / google
Now your schedule will be sent to you each day and you’ll be able to avoid checking in with your calendar directly. The dream.
