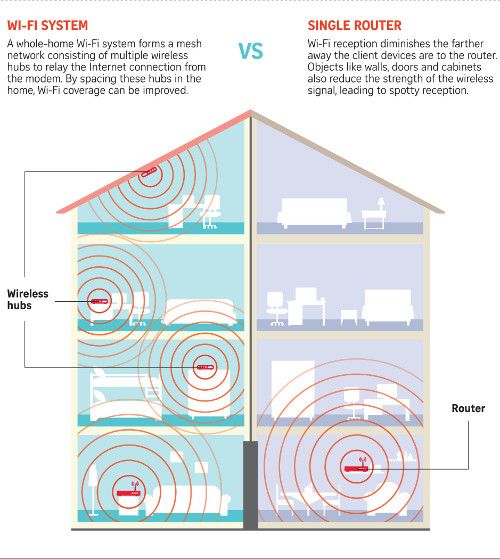
Mesh Wi-Fi networks have quickly become one of the most popular ways to blanket homes (especially large ones) in strong, stable Wi-Fi signals. Though they’re more expensive than traditional one-router setups, they’re also more effective and reliable. And one of the best parts is that they’re a lot easier to setup than you might think. Here’s a quick guide on how to get a mesh network up and running, as well as how to optimize your coverage.
Picking out the right mesh network for you
Before setting up your mesh network, you need to get your hands on some mesh hardware. You’re going to need one router to serve as your primary access point, and then anywhere from one to three extra ones to serve as secondary access points. The amount you need depends on the size of your home and the coverage distance of the individual routers.
When looking for mesh routers, the main things you need to consider are coverage space, speed, network compatibility, and price. Try to find mesh routers that bring you great speeds and coverage space for a competitive price. Also, if you can, finding something with Wi-Fi 6 compatibility is a nice bonus. Wi-Fi 6 is the latest Wi-Fi standard that, aside from merely being faster than last-generation Wi-Fi, is also much more stable and consistent as well.
There are lots of difference mesh routers out there, but out of all of them, we think that the eero 6 and eero Pro 6 are your best options. The eero 6 is more affordable at $129 and features 1,500 square feet of coverage and a dual-band design, while the eero Pro 6 is more of a premium option at $229 and has 2,000 square feet of coverage and a tri-band design, which means it can handle having more devices connected without any performance issues occurring. Both routers deliver excellent speeds (900Mbps and a gigabit, respectively) and both also support Wi-Fi 6.

The eero 6 is a very cost-effective mesh router that delivers strong performance for an affordable price.

The eero Pro 6 is eero’s flagship premium mesh router, offering up incredible performance for a heftier, yet completely fair cost.
Setup your primary access point
Once you’ve got your mesh routers on-hand, the first thing you need to do is wire one of them to your modem directly. Ideally, this should be in a central location in your home, as this is the most effective way to ensure the primary access point can communicate with the secondary access points you’re going to be setting up next. Additionally, it’s also recommended to place the access point in an elevated position for better signals.
After you plug in your primary access point, you’re going to need to follow the instructions included for whichever mesh routers you chose in order to launch your network. For example, with eero, you use a smartphone app.
Connect your secondary access points
Now that your primary access point is good to go, the last step is to properly setup your secondary access points. This is simple, as all you’ll need to do is plug them in and follow whatever instructions your chosen mesh developer provided with your routers.
In terms of where you should put them, we recommend putting your secondary access points halfway between your primary point and the edges of areas the primary point doesn’t reach. This ensures that you’ll have a strong and stable connection in every area. Just like with the primary access point, choosing an elevated position is a good idea for achieving maximum signal strength.
Once your secondary access points are properly setup, they will rebroadcast signals sent to them by the primary point right to your devices.
Optional: What you need to know about wired backhaul
If your entire house is wired for ethernet (or you pay to have that work done) you can take advantage of a special feature most mesh routers support, which is called wired backhaul. This essentially allows the primary access point to communicate with the secondary ones through an ethernet connection instead of a wireless one, which strengthens the quality of the signals that the secondary access points broadcast to your devices.
