If you’re constantly struggling with dropped Wi-Fi connections or are dealing with pesky buffering when you’re streaming online videos due to slow Internet speeds, you’re not alone. According to a 2021 Parks Associates study, more than 40% of U.S. households with broadband have experienced Wi-Fi issues, including slow speeds, connection dropouts, and difficulty connecting devices to the Internet. Although you could just buy a new router, you don’t have to. Solving these issues involves a simple fix, and the problem may not even rest with your Internet service provider (ISP) or your current hardware.
So before you go through the process of switching broadband providers or upgrading your existing Wi-Fi network, we’ll show you how to make some quick changes to your router settings to ease congestion, reduce interference, and gain connection speed and reliability.

What causes Wi-Fi interference?
At the heart of Wi-Fi connectivity issues for some households may be the sheer number of connected devices trying to access the network, causing signal interference. During the pandemic, Deloitte observed that 38% of Americans added more Wi-Fi devices to their homes to fulfill remote working and distance learning requirements. The average home in the U.S. now has approximately 25 connected devices, up from just 11 in 2019. That’s a 127% increase in the number of devices fighting for a good, stable Wi-Fi connection.
And if you live in a crowded apartment or condominium complex, you’re facing even greater interference from signals coming from your neighbors’ units.
There are several different types of interferences. The first is called co-channel interference, and this happens when you have too many devices trying to communicate on the same channel. Adjacent channel interference is the second type, and this occurs when there’s noise from overlapping channels. And finally, there is interference generated from non-Wi-Fi devices, including household appliances like microwaves, cordless phones, and even old analog cameras.

How do Wi-Fi devices connect?
Every Wi-Fi device, whether it’s a smart doorbell or a tablet, connects to your router by hopping on a band designated for Wi-Fi use. Typically, the bands available are within the 2.4GHz or 5GHz spectrum. The lower 2.4GHz spectrum can travel further, giving you greater range across your home, but operates at a slower speed. This band is more prone to interference, while the 5GHz operates at a higher spectrum that’s less likely to be subjected to interference from nearby broadcasting Wi-Fi devices.
The 5Ghz spectrum is usually faster, but covers a smaller area and is worse at penetrating objects, like solid doors and walls.
In general, because some home appliances, like microwaves and audio-visual equipment, can cause interference with the 2.4GHz band, you’ll want to use the 5GHz band where possible. Many routers will give you the option to select the preferred band, and some will also allow you to turn off the 2.4GHz band. You’ll want to check with your router’s manufacturers for details on how to switch bands if needed. Of note, however, is that some older devices still exclusively rely on the 2.4GHz band, so turning off this entire band may not be a feasible option.
Within each Wi-Fi band, there are also numerous Wi-Fi channels. Think of the Wi-Fi band as the highway a device can hop on, whether that’s 2.4GHz or 5GHz, and the Wi-Fi channel as the specific lane that a car can drive on the route.
If your router operates on the same Wi-Fi channel as your many neighboring routers in your neighborhood, there can be gridlock and congestion, like a freeway during rush hour traffic. In general, you’ll want to find a channel that’s least used in your neighborhood to avoid interference. This way, it would be like your devices are on an open freeway.
How to find the right Wi-Fi channel to connect
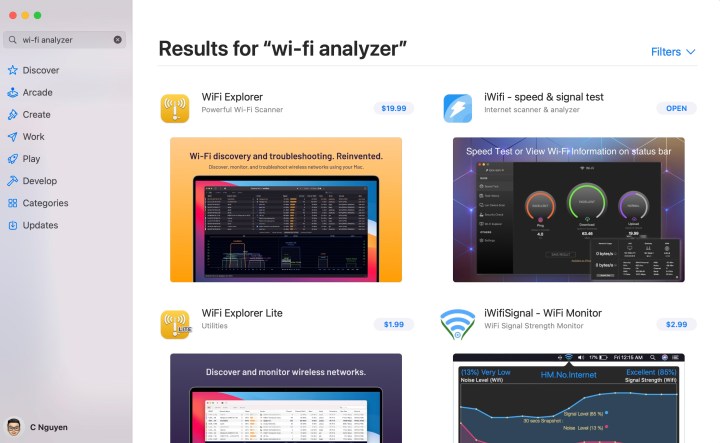
The first step in avoiding the Wi-Fi connection gridlock is to identify which channel to use so you can make the appropriate setting changes to your router. To do this, you’ll need to rely on either software that ships with your device or third-party apps. A number of Wi-Fi analyzer apps exist for Android, iOS, Windows, and macOS devices.
Step 1: Search for and download a Wi-Fi analyzer tool on your smartphone, tablet, laptop, or desktop. On my Mac, I navigated to Apple’s MacOS App Store and searched for “Wi-Fi Analyzer” in the search bar. A number of free, freemium, and paid options will pop up. I chose “iWiFi” as the app of choice for this article.
Step 2: Install and launch your preferred Wi-Fi analyzer app. Run a scan of your Wi-Fi network to see the channel(s) that neighboring devices and networks are using to connect.

Step 3: You’ll want to look to see if any devices found use channels 1, 6, or 11, as these are the only Wi-Fi channels that don’t overlap with any others and would help solve interference issues. From the scan, you’ll want to identify the channel that is least used by nearby devices, and make a note so you can change your own router settings to use that particular channel. It’s like using a GPS navigator and rerouting your trip to take a less congested highway.
Configuring your router to use the proper channel to reduce interference
Currently, most Wi-Fi routers automatically choose the channel for you when you set up your network for the first time. However, as wireless conditions around you change — your neighbors upgrading to a different router and as you add more devices to your home -— that channel may no longer be the best one to connect your devices.
Step 1: From the Wi-Fi analyzer network scan, identify and choose the least used channel to configure your network. In my case, I can choose either channel 6 or 11.
Step 2: The steps to changing your router settings will vary wildly between different router manufacturers and models. You’ll want to consult your manufacturer for instructions on how to access your router’s administrator profile.
In my case, I am using an older modem router combo unit from Xfinity, my broadband service provider. To change the channel, I have to navigate to the Xfinity Connect portal on my browser by typing “https://internet.xfinity.com” into the address bar.
For many other types of routers, you can access the administrator portal by typing “192.168.1.1” into the address bar. You’ll also need the administrator name and password to log in, both pieces of information you can obtain from the manufacturer if this is your first time accessing the portal.
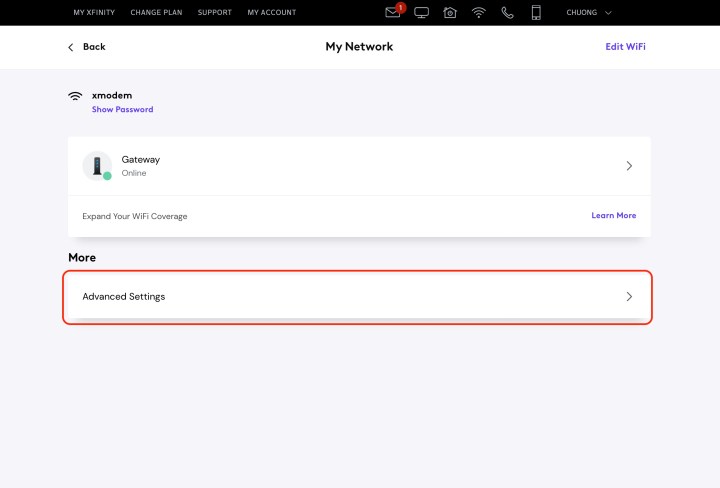
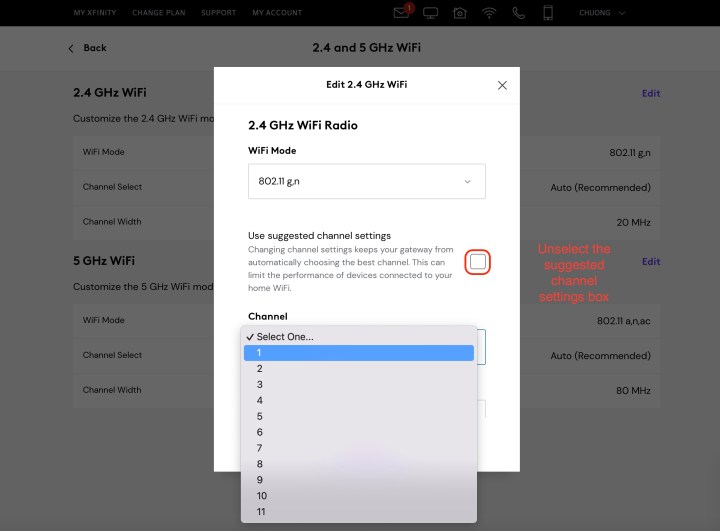
Step 3: On my Xfinity portal, I have to click on my router name — which I had set up and changed when I had initiated broadband service with Xfinity from whatever default was given initially — and then click See network on the following screen. A new screen will load, and from there, the “advanced settings” option can be accessed.
Under the advanced settings portion, there are options to choose the 2.4GHz or 5Ghz band, and under each band, you can choose the channel and channel width. By default, the channel is automatically chosen. You’ll want to edit that and manually choose the channel. On the 2.4GHz band, it’s fine to choose a 20MHz width, but you can opt for a wider 40Mhz or 80MHz channel width.
Step 4: A few recent routers and mesh networks will also allow you to access and change your router’s bands, channels, and channel width through a companion app that can be downloaded to your smartphone. This option may not be available for all routers or mesh networks, like Eero.
What do I do if none of these steps help?
If channel interference isn’t the culprit of your Wi-Fi woes, you can also try our guide on identifying some common Wi-Fi problems.
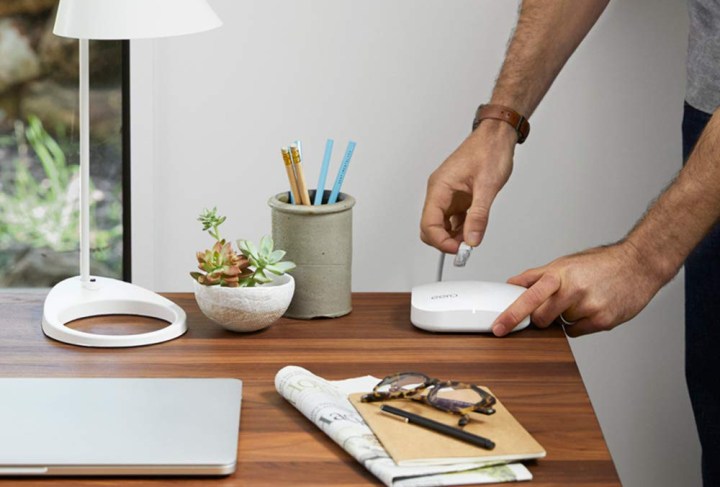
If none of the diagnostic tests work, you may want to try upgrading to a newer router or setting up a whole-home mesh network to extend your Wi-Fi signal across your entire home with the help of satellite units. Advances in Wi-Fi technology, like Wi-Fi 6 and the newer Wi-Fi 6E protocols, help to alleviate network congestion and latency, making routers that rely on these standards ideal for streaming large video files, gaming, and connecting multiple devices simultaneously. Wi-Fi 6 has largely been hailed as the biggest advancement in Wi-Fi in a decade, and rightfully so!
If you experience signal dropouts and Wi-Fi dead zones the further you move away from your router, you can improve your coverage by switching to a whole-home mesh network. In general, you can add more satellite nodes in larger homes to blanket your entire property with a Wi-Fi signal. While these nodes serve a similar purpose to Wi-Fi range extenders, whole-home mesh networks simplify the process by broadcasting all on the same network SSID. This way, you don’t have to connect and disconnect between different SSIDs depending on which node you’re trying to access, and the process is more seamless than a range extender.
Editors’ Recommendations
Services Marketplace – Listings, Bookings & Reviews