None of us are perfect, and all of us have published Facebook posts with misspellings, grammatical errors, mistaken “facts,” or opinions that we immediately realized might not need to be aired in public. When that happens, you’re going to want to hop into your post and fix the problem — either by changing it or deleting it altogether. Luckily, it’s really easy — if you know how.
What follows are directions on how to edit a Facebook post, delete it, and restore it on the web and using the mobile app. (I used the Facebook app on a Pixel 6, but the steps will be similar on other phones and on iOS.)
On the web
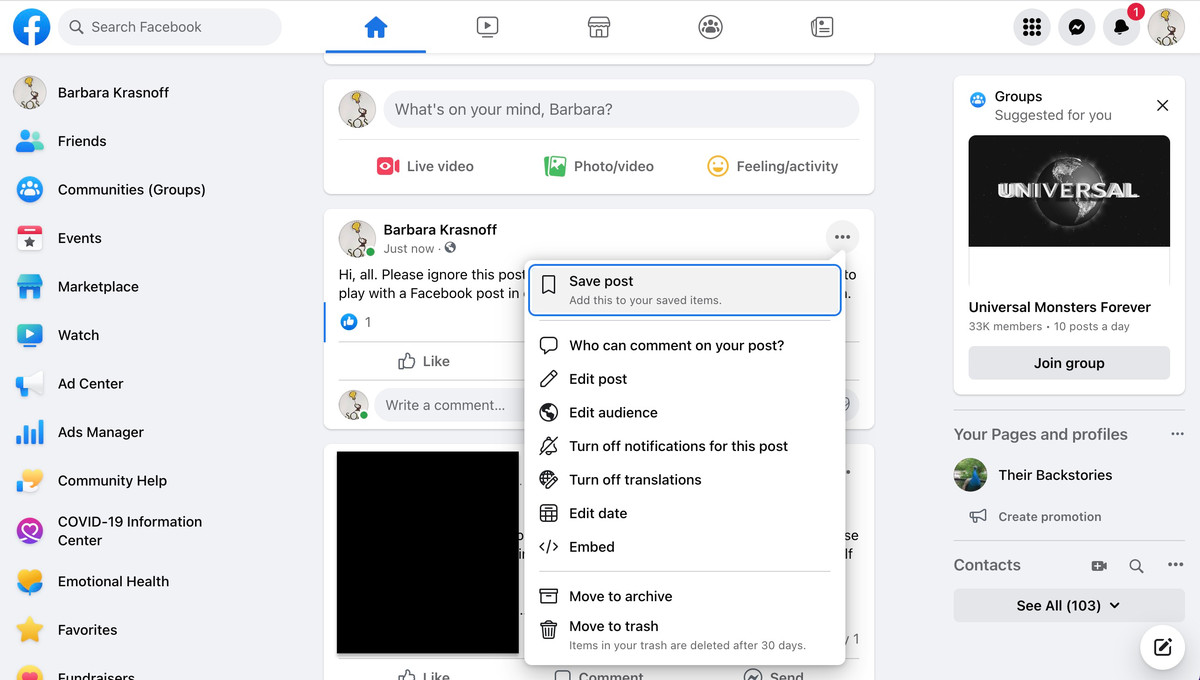
- In the post you want to edit, click on the three dots in the upper right of your post.
- Click on Edit post if you want to change it; make your edits, and then click on Save.
- Click on Move to trash if you want to delete it, and then click on Move.
:no_upscale()/cdn.vox-cdn.com/uploads/chorus_asset/file/23978782/Screen_Shot_2022_08_29_at_10.23.40_AM.png)
Note: when you “delete” a post, you will actually be moving it to a trash section, where it will be finally deleted after 30 days. If you want to restore it or delete it immediately, follow the following steps.
- Click on your personal icon in the upper right corner
- Click on Settings & privacy > Activity log
- In the left-hand column, scroll down to and select Trash
- Find the post and click its checkbox. Click on Restore to restore it to your timeline, or Delete to permanently delete it.
- In the resulting pop-up, click on Restore or Delete.
:no_upscale()/cdn.vox-cdn.com/uploads/chorus_asset/file/23978794/Screen_Shot_2022_08_29_at_11.50.33_AM.png)
On a mobile device
- Tap on the three dots in the upper-right corner of the post
- Select Edit post if you want to change it; make your edits, and then click on Save.
- Select Move to trash if you want to delete it, and then click on Move.
:no_upscale()/cdn.vox-cdn.com/uploads/chorus_asset/file/23979232/Screenshot_20220829_112947.png)
:no_upscale()/cdn.vox-cdn.com/uploads/chorus_asset/file/23979234/Screenshot_20220829_111245.png)
The process of restoring or permanently deleting a post is similar to that on the web.
- In your timeline, tap on your personal icon in the upper left corner.
- Tap on the three dots to the right of Edit profile.
- In your Profile settings, select Activity log > Trash.
- Select the checkbox of the post you want to restore or delete.
:no_upscale()/cdn.vox-cdn.com/uploads/chorus_asset/file/23979236/Screenshot_20220829_113821.png)
:no_upscale()/cdn.vox-cdn.com/uploads/chorus_asset/file/23979238/Screenshot__Aug_29__2022_12_00_41_PM_.png)
- To restore the post, tap on Restore at the bottom of the screen. To permanently delete it, tap the three dots at the bottom right, and select Delete.
- Tap Restore or Delete in the pop-up menu.
