AMD CPUs are among the best processors around and suit all sorts of budgets, but they are a little different to their Intel counterparts.
For starters, the pins are on the chip itself, rather than in the socket. You’ll also need a different bracket to install the cooler more often than not. But even with those minor hiccups in our way, there’s no reason you can’t learn how to install an AMD processor in a few minutes.
If you’ve not bought your AMD chip yet, here’s a guide to the best AMD processors available, no matter what you want to do with them.

Get your weekly teardown of the tech behind PC gaming
Step 1: Prepare your parts

You don’t want to have to stop half-way through the installation process to find something that you need to complete the installation, so make sure you have everything within easy reach before getting started. You’ll need the AMD CPU itself, a motherboard to plug it into, and a cooler. If the cooler comes with heatpaste pre-applied, like the stock AMD Ryzen chiller, then you don’t need anything else. If it doesn’t, you’ll also need some heatpaste of your own.
It’s also a good idea to have a lint-free cloth and some 100% isopopyl alcohol to hand, in case you get a bit overzealous with the heatpaste. We’s also recommend an anti-static bag for placing electronic components on, and make sure that you have good lighting so that you can see what you’re doing.
Depending on your cooler, you may need a screwdriver as well. Typically, a Phillips head with a relatively long body, but check your cooler to be sure.
Note: We would also recommend you use an anti-static wristband to make sure you don’t transfer any static charge to your components. At the very least, however, make sure that you’re installing your AMD CPU on a non-conductive surface, and ground yourself before starting by touching something metallic, like your PC’s case or PSU chassis.
Before proceeding, ensure the work area is clean and clutter free. This will help to ensure no dirt and dust makes its way into your motherboard and the CPU socket.
Step 2: Identify the CPU socket
It’s important to make sure you know where the CPU socket is situated on your motherboard before you unpack the new CPU.
One way to do this is to check the motherboard manual. However, if you know what you are looking for, a visual check should suffice. The CPU socket is a rectangular portion of the motherboard, with a metal lever along one side. This is a retention arm that locks into place when pushed under a catch. When released, the arm can be lifted to release the securing bracket — the CPU will sit underneath this/
When you’re ready, lift the retention arm into the vertical position. If you’re working on a brand new motherboard, remove the protective plastic insert from the socket. If you’re replacing a CPU, you’ll need to remove the old CPU and potentially its cooler too. For that, see the instructions for your specific cooler. When removing the old CPU, be careful when handling it if you plan to reuse it.
Step 3: Install the CPU

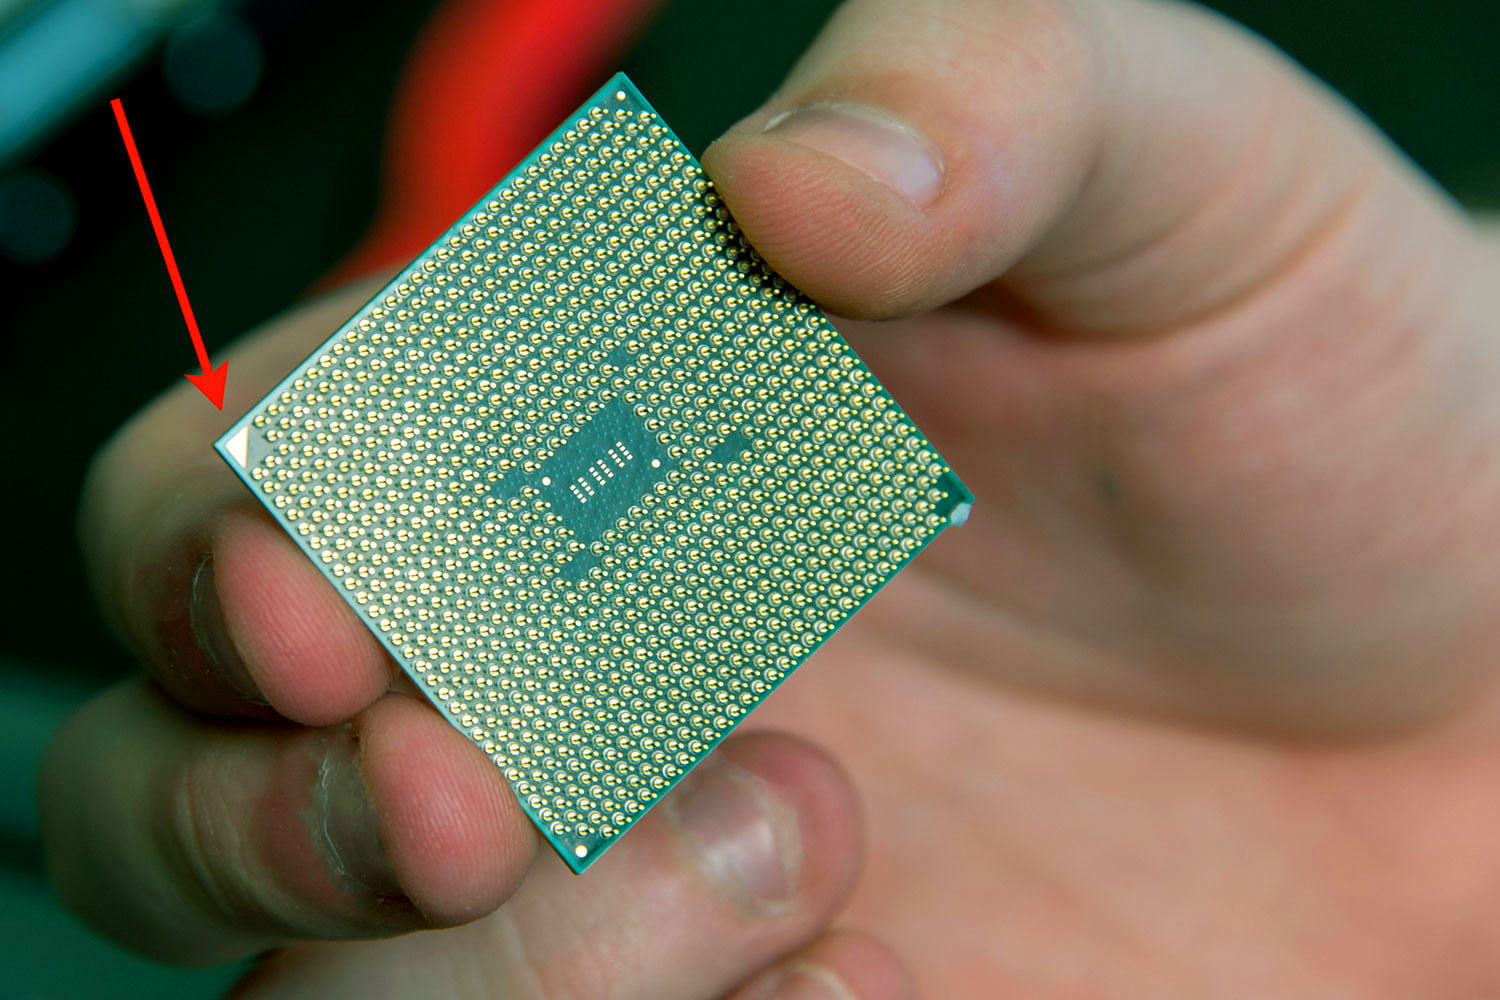
Note: While older AMD processors have the pins on the chip itself (Pin Grid Array, or PGA), AMD has recently followed Intel in adopting recent models use the Land Grid Array (LGA). Bending or breaking pins on an older CPU render it processor unusable. Similarly, bending pins on an LGA port will leave the entire motherboard useless. Whichever CPU type you’re using take special care, and only handle the device at its corners.
Remove your new CPU from its packaging if you haven’t already, and look at its underside. In one of the corners you should see a small, golden triangle. This corresponds to an indented triangle on your motherboard’s CPU socket and will help you orientate the chip the right way. Carefully place it into the socket, making sure that all of the pins slip home into their corresponding ports. It shouldn’t require any force, so if it doesn’t fit quite right, remove it, and start again.
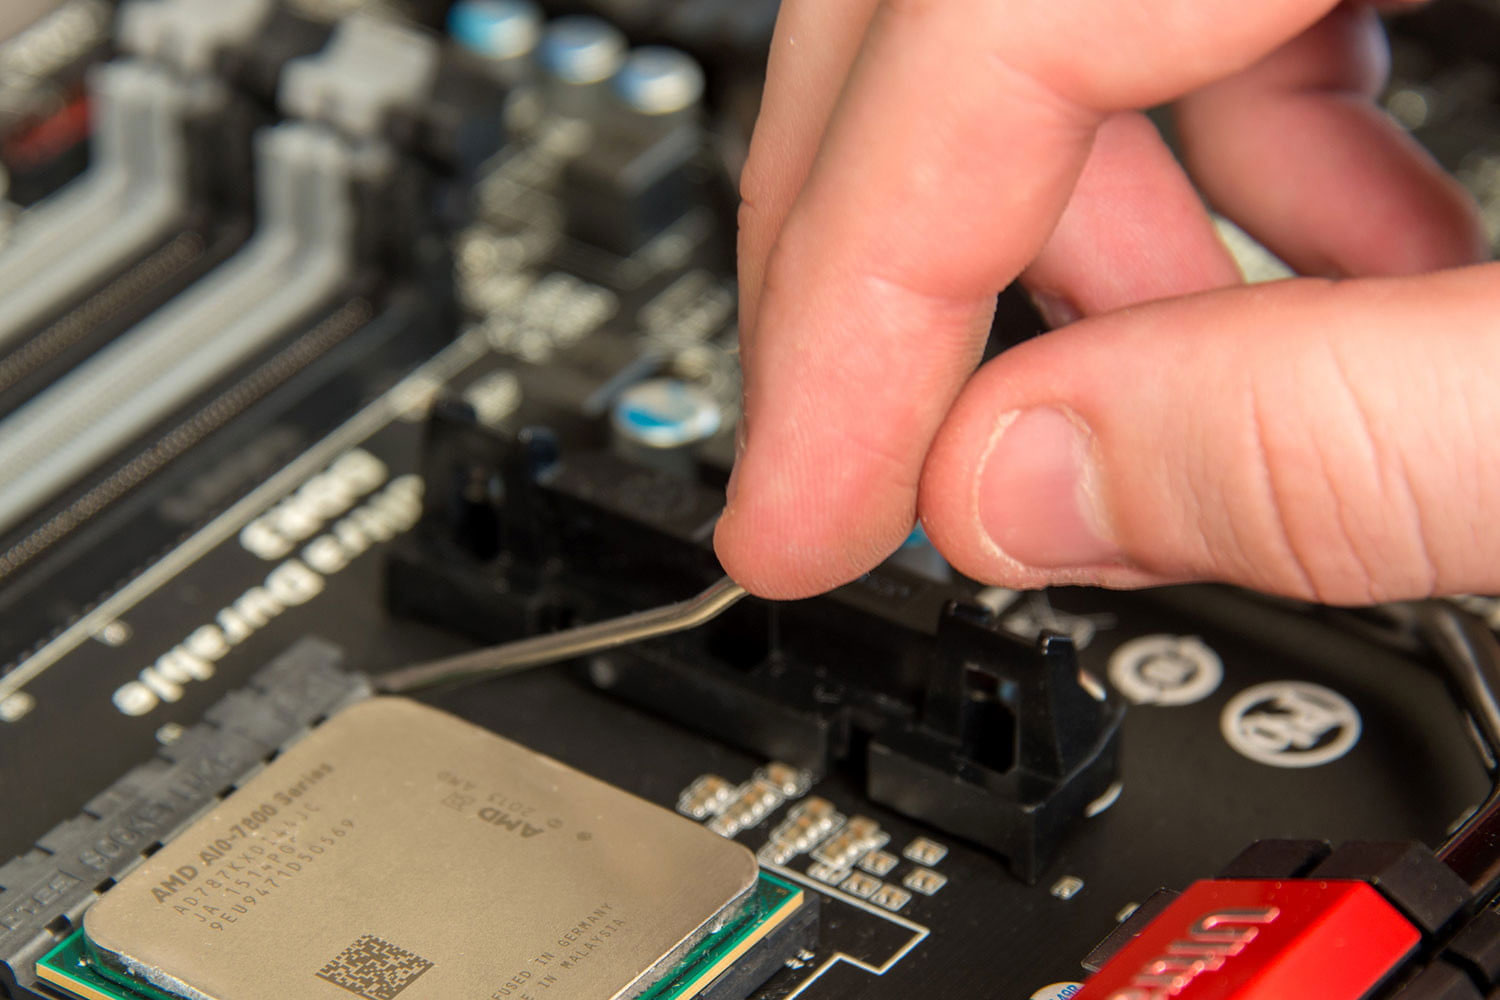
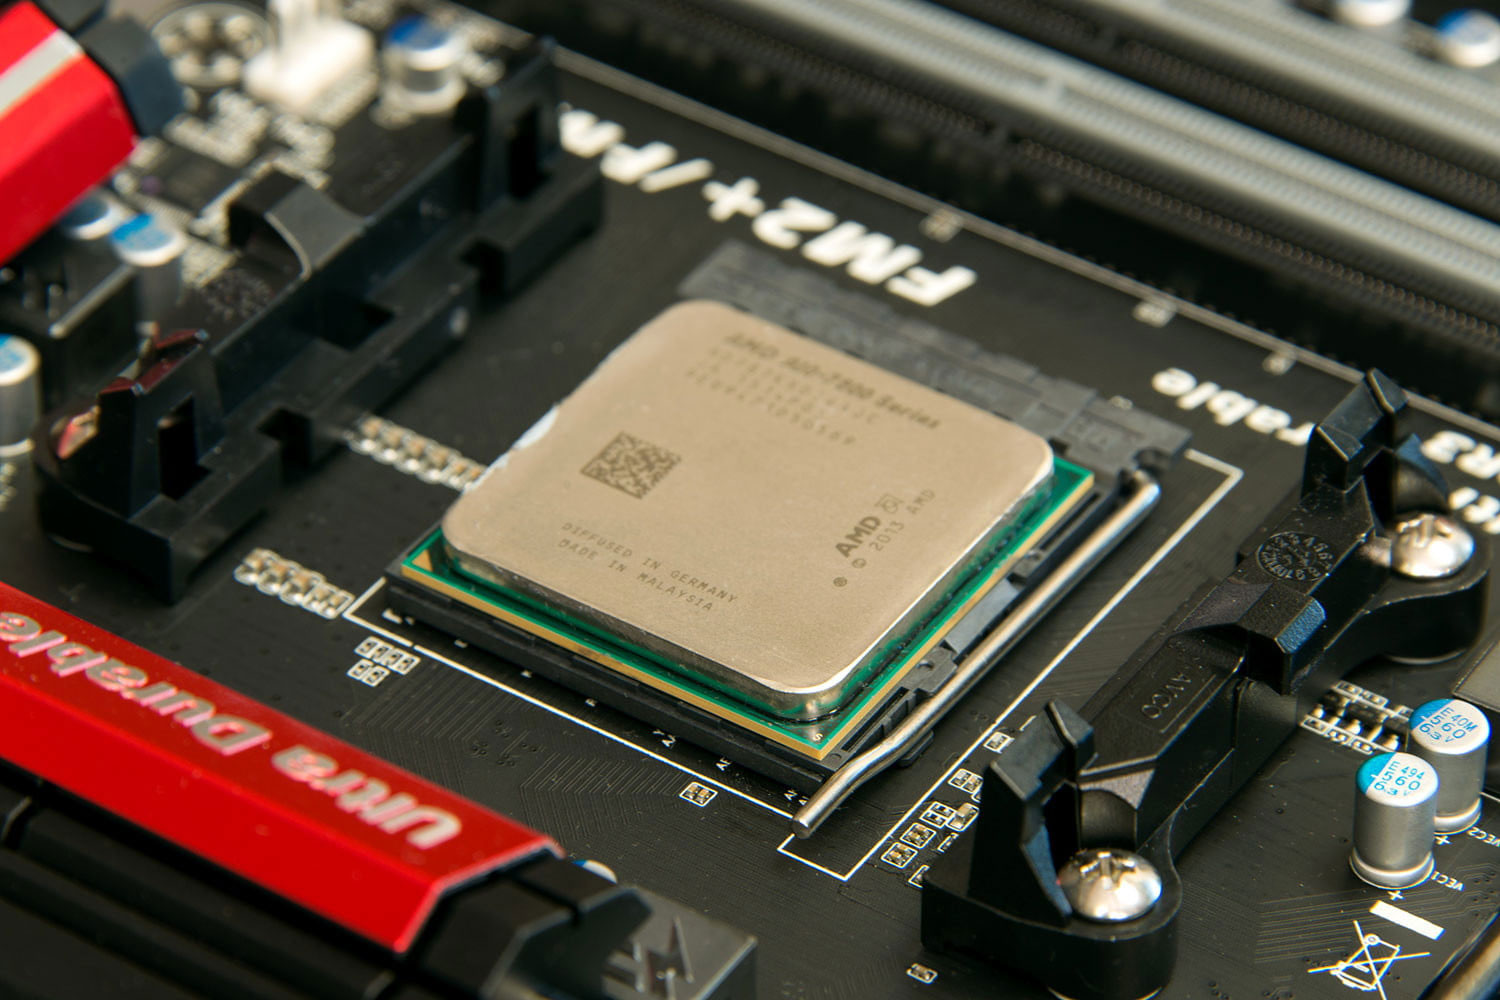
Once the CPU is in place, and you’re certain that it’s installed correctly, press the retention arm back into place on the socket. This will take a small amount of force, but it shouldn’t be excessive. Trust your instincts and if you’re unsure, double check everything is right before pressing any harder.
Step 4: Install the cooler

No AMD processor will work for long without a cooler. You’ll get one in the box with most AMD CPUs, or you can use an aftermarket option, whether that’s air or liquid. In any case though, the installation will be very specific to your chosen cooler, so refer to the manual for any steps you may need to take. You are quite likely to need access to the rear of your motherboard, so make sure that’s possible by removing the back panel from your PC chassis.
Whatever cooler you install though, it needs something to transfer heat from the CPU to the cooler effectively. That’s where the thermal paste or heatpad comes in. A number of CPU coolers will have the paste pre-applied in the factory, so if yours has that, you can simply follow the cooler installation instructions. If yours doesn’t have paste pre-applied, however, you’ll need to do it yourself.

There are a number of ways you can apply heat paste, from spreading it across the whole surface, to cross techniques, and there are arguments for more or less. The simplest and most beginner friendly of them all, though, is to squeeze a pea-sized amount right in the middle of the chip. If you end up with too much, remove the chip and use the lint-free cloth and isopropyl alcohol to carefully clean it off. Then start the process again.
Some heatpaste is electronically conductive. While most isn’t, it’s a good rule of thumb to avoid getting any of it on the underside of the CPU, or in any of the ports in the socket. Be careful and precise with your placement.
If you’re using a heatpad, simply place it over the CPU, making sure that it’s the correct size and that it’s fitted snuggly.
When your heat transfer material is in place, it’s time to install the cooler itself. Follow the instructions in your cooler’s manual, with one caveat. When it comes to the screws that hold it in place, make sure to screw them in slowly (by hand, if possible) and use a cross pattern — screw in opposite corners alternatively, making sure no one screw is more than a turn or two tighter than the others at any one time.
Then take the cooler’s fan header and plug it into the respective slot on your motherboard. It will be a three or four pin fan header, usually with a designation on the board that reads CPU Fan, or similar. If in doubt, refer to your motherboard’s manual.
Step 5: Test the CPU

If the steps above all went well, your CPU should now be successfully installed. If you are in the process of building a PC make sure you have everything in place before proceeding. That’s when you can start your system up and see if it posts and better yet, boots to your operating system of choice. If it does, congratulations, chances are all is well. Now you could consider trying to overclock your CPU.
Before you do anything else, though, we’d recommend using a temperature sensing application like AMD’s own Ryzen Master or HWInfo to make sure the CPU is cooled well enough. If it isn’t, you may find that your cooler isn’t mounted right, or the screws aren’t tight enough.
If your system doesn’t boot, refer to your motherboard manual to decode any diagnostic beeps or lights, then try remounting the CPU and cooler.
Services Marketplace – Listings, Bookings & Reviews