With the right keyboard shortcuts, taking a screenshot on a Mac is very straightforward — although they don’t always save to the right location. Fortunately, there are a number of locations you can choose from and selecting from them is as quick and easy as taking a screenshot in the first place.
Here’s how to choose where screenshots are savedon a Mac.
How to change where screenshots are saved on a Mac
The “Command + Shift + 5” method will open the full-screen capture panel on your Mac. This defaults to a large capture window called Screenshot that you can adjust for your screenshot and several modes below that can change what kind of capture you want. You can choose to capture the whole screen, a specific window of an app (usually for larger Mac screen), or a customized portion of the entire screen, along with video capture options.
What isn’t clear is how to change where that screenshot saves to. Here’s what to do:
Step 1: Press Command + Shift + 5 to open the Screenshot capture panel and get started.
Step 2: Look at the Screenshot panel controls at the bottom of your screen. At the right end, you should see a button called Options. Select it to open a pop-up menu.
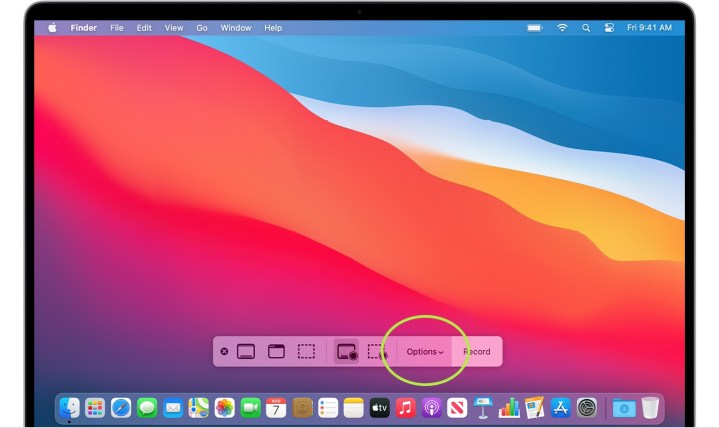
Step 3: At the top of this new pop-up menu is a section labeled Save To. Here you will see a variety of popular folders or apps you can save the screenshot to, including Documents, Clipboard, Mail, and Preview. If one of those works for you, select it.
Step 4: If you want a dedicated file for saving this particular screenshot, select Other Location instead. This will allow you to pick or create a specific folder for storing these files. If you take frequent screenshots, we suggest creating a dedicated folder for this purpose.
Step 5: For smaller screenshots, the *Command + Shift + 4 *option allows you to immediately drag a customized screenshot window with your cursor to capture whatever part of the screen you like. It’s very fast and an excellent option for taking frequent screenshots. The problem is that these screenshots are saved as individual files on your desktop, so before long, they are covering your entire home screen and causing issues.
Another option, is to use the Terminal.
Changing where screenshots are saved on a Mac using Terminal
You can use the Terminal to change the location where screenshots are saved on a Mac, too. It’s a bit more of an involved process, but follow along with these steps and you won’t run into any issues.
Step 1: Head to your Terminal to type out a couple of important commands. You can find the Terminal in the Applications section on your Mac Dock, within the Utilities folder.

Step 2: With the terminal open, type (or copy and paste) this command:
defaults write com.apple.screencapture location
Finish by pressing the spacebar. Don’t enter the command yet!
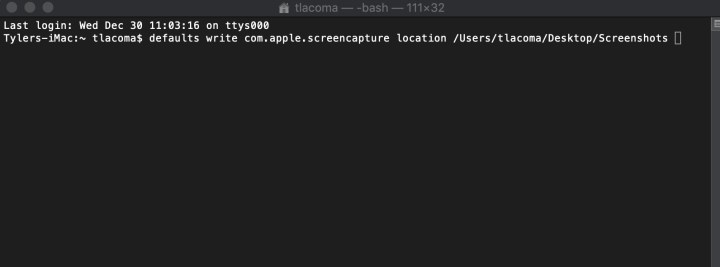
Step 3: You need to end the command by specifying a proper folder destination. You can type this out, but it’s usually much easier to find the folder itself and drag it to the Terminal window. This will automatically paste the folder location into the command for you (without doing anything to the folder).
As before, we recommend creating a folder on your desktop called screenshots to use for this, but you can drag any folder destination you want. However, do not drag a folder from the left-side Finder menu, as these are just folder shortcuts that can be removed but won’t give a helpful destination. Always use the folder itself.
Step 4: Press Enter. With the command correct, Terminal should process this without any errors. To finish, paste in the following:
killall SystemUIServer
Press Enter again. Your quick screenshots should now be saved to the folder of your choice.
Handily, the Screenshot capture panel also appears to recognize this command. If you create and use a folder for these quick screenshots, it will also become the default save location for any screenshot mode you may use in the capture panel, adding another layer of usefulness.
Want more tips to improve your Mac skills? Here are our top tips to make your MacBook even better.
Editors’ Recommendations
Services Marketplace – Listings, Bookings & Reviews